With arpschuino32 the page that opens includes two parts:
Spécial arpschuino32 Mode :
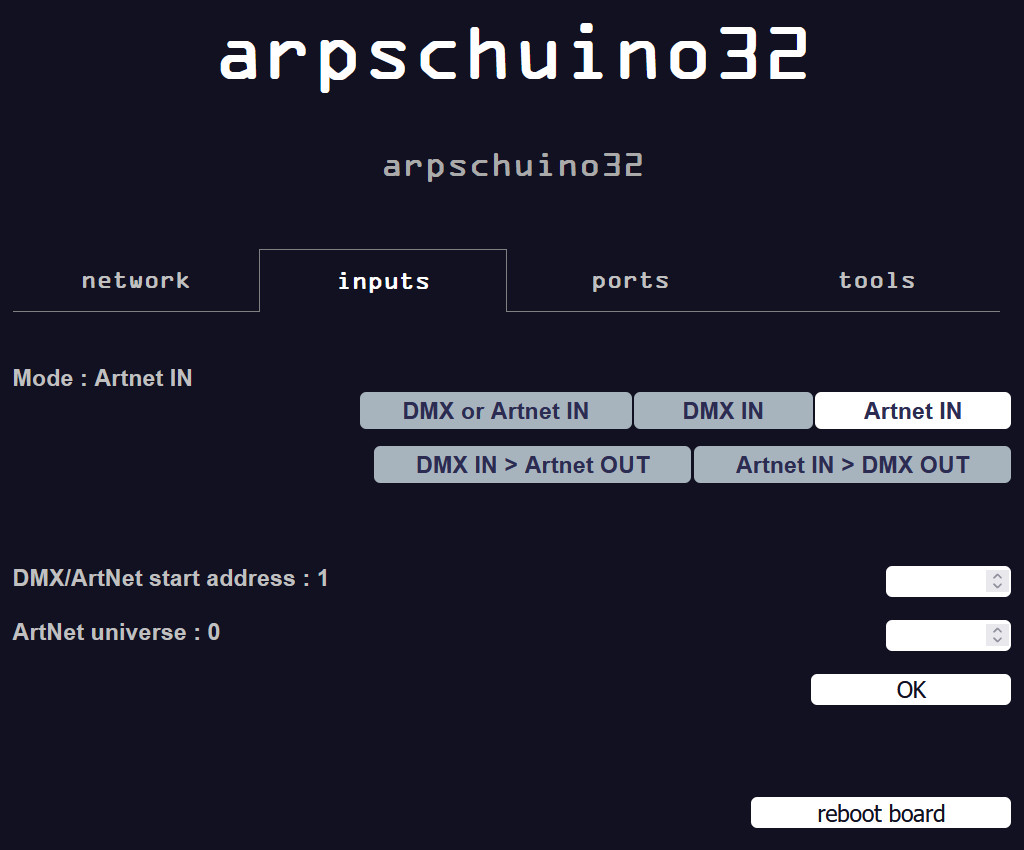
Allows you to choose in which mode the arpschuino32 will operate:
DMX or Artnet IN : The selection will be made automatically: if the board receives DMX (wired), it will obey DMX orders.
Otherwise it will listen to the Artnet wifi if it is available.
DMX IN : In this mode, the board is controlled in DMX, wifi is only used for this server.
Artnet IN : Artnet wifi only.
DMX IN > Artnet OUT : the board is controlled in DMX, the signal is transformed into Artnet wifi. The use of a wifi router is still recommended.
Artnet IN > DMX OUT : the board is controlled in Artnet wifi, the signal is transformed into DMX, recoverable via the XLR socket.
Address :
The following two fields, common to arpschuino32 and wilulu32, allow you to define the DMX address and the Artnet universe.
In general, new data is taken into account the next time you start (or reset) arpschuino32.
The DMX address and the Artnet universe are no exception to this rule.
Note that you can still address the board with the arpdress board as with an arpschuino².
2.The ports page:
Special wilulu32 Type of wilulu32 :
Since firmware version 1.4 and the arrival of the wilulu32 quad, it is necessary to specify the type of wilulu used.
Note that for the wilulu power output(s), only the PWM, on/off, custom and inactive modes are available.
Port configuration:
This is where we will configure the functionalities of ports A, B and wilulu out.
For each of these ports, we will choose if we want to control LEDs, relays, motors etc...
When you click on one of these buttons, you see the different mode parameters displayed.
We will detail these parameters in the following chapters.
For each port, the DMX address of this port is indicated (for example current port A address: 13).
If you make changes, this address will be updated at next reboot of the board .
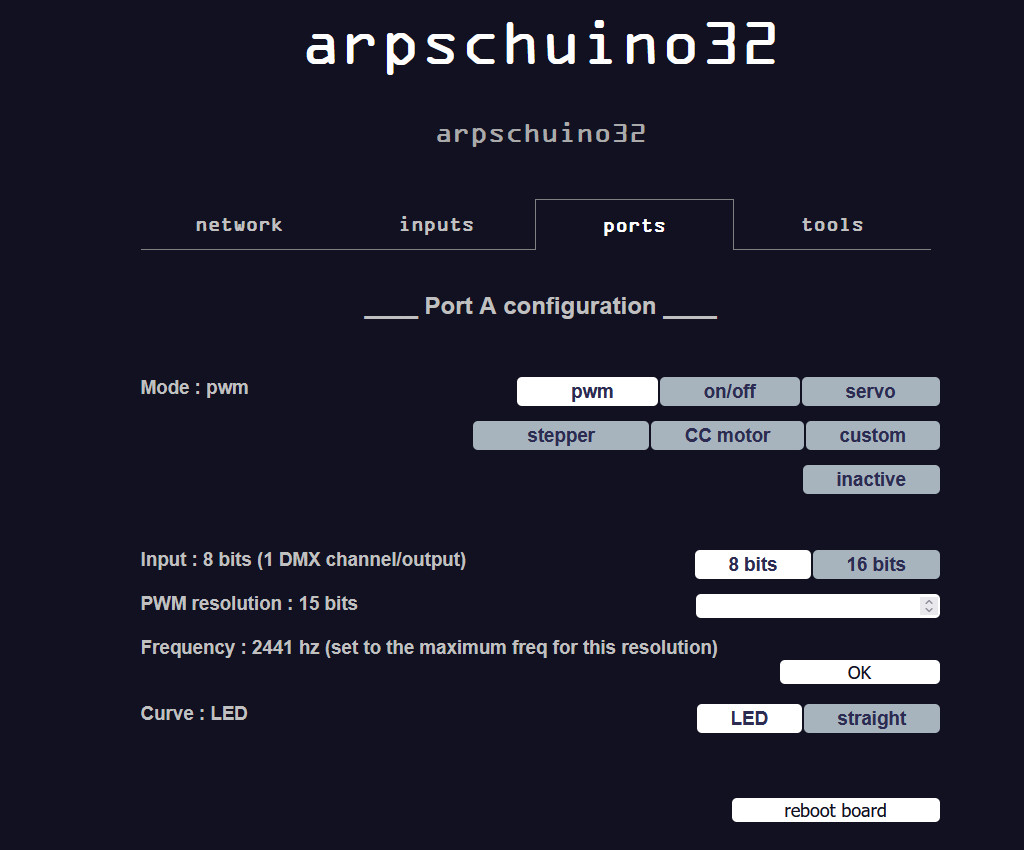
3.PWM configuration:
By default, the arpschuino32 is in PWM mode. This is the mode for dimming LEDs, lamps or other.
In this mode, 8 outputs are controlled, from Arp0 to Arp7 for portA, from Arp8 to Arp15 for portB.
Input : 8/16 bits :
8 bits is the normal, simplest mode, a DMX circuit drives a PWM output, over 255 steps.
In 16 bits, an output is driven by 2 DMX circuits for greater precision.
This mode should only be used if you have a controller or software that allows such control.
In 16 bits a port will require 16 DMX circuits to drive it.
PWM résolution :
PWM resolution should not be confused with DMX resolution.
In PWM, the dimming is done by hashing the signal (more info here),
If a resolution of 8 bits is sufficient to dim conventional lamps, the same is not true with LEDs which have no inertia.
With the arpschuino32, you can now achieve really fine gradation with a resolution of up to 16 bits (65535 steps!).
Frequency :
Another parameter to take into account is the frequency. It is automatically set to the highest value available. Note that it depends directly on the chosen PWM resolution.
If the frequency is too low we do not notice it with the eye, but on video, flicker will appear.
For LEDs, the best compromise is to set the resolution to 14 bits, which fixes the frequency at 4882 Hz.
For your information, previously our best PWM, that of the spider board, was 12 bits and 1600 hz.
Curve :
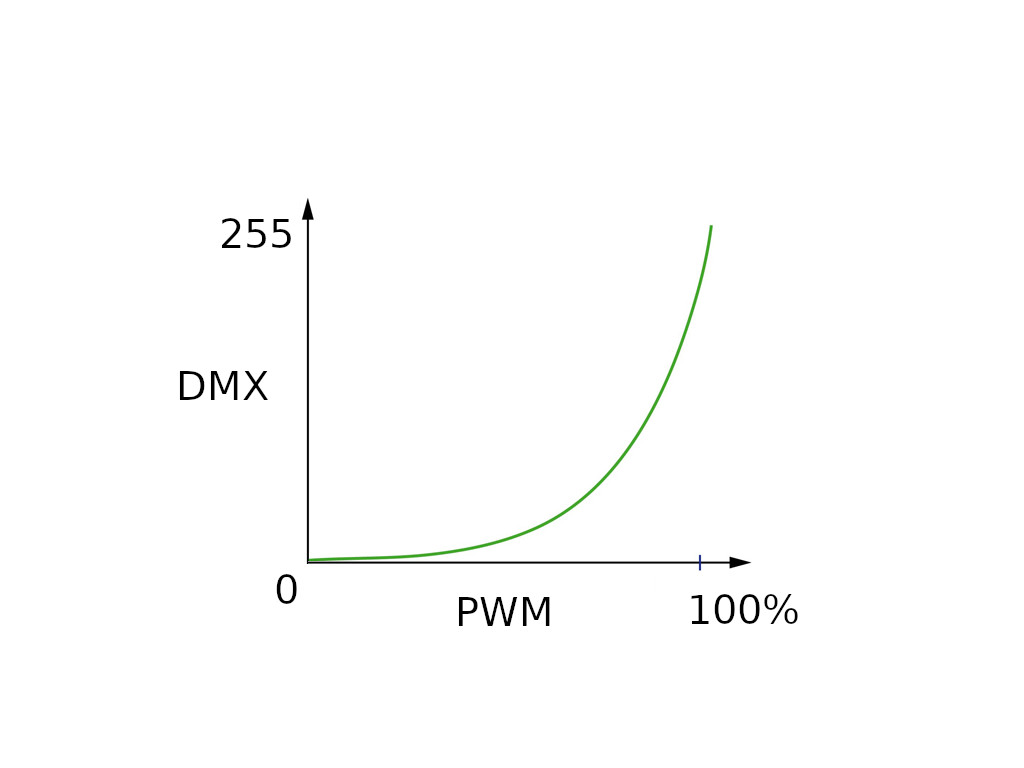
We have two curves: a straight curve ideal for classic filament lamps; and an exponential curve suitable for dimming LEDs.
If you're wondering what's the point of having more than 8-bit PWM resolution when the DMX control was 8-bit, this curve is the answer!
This is basically what the LED curve looks like:
We can see that at the beginning of the dimming, where the LEDs can be faulty, the level increases very slowly, then increasingly louder.
To the eye, this reproduces a more natural behavior. Give it a try!
New in 1.4 Strobe channel :
Since firmware version 1.4, we can add a DMX circuit to control a strobe.
If we activate this mode, we will have for each LED, a circuit for the level (2 if you are in 16-bit mode) and an additional one for the strobe.
If this circuit is at 0 the strobe is inactive, the light is fixed. Beyond that we will determine the frequency of the strobe to a value between 1 and 30hz.
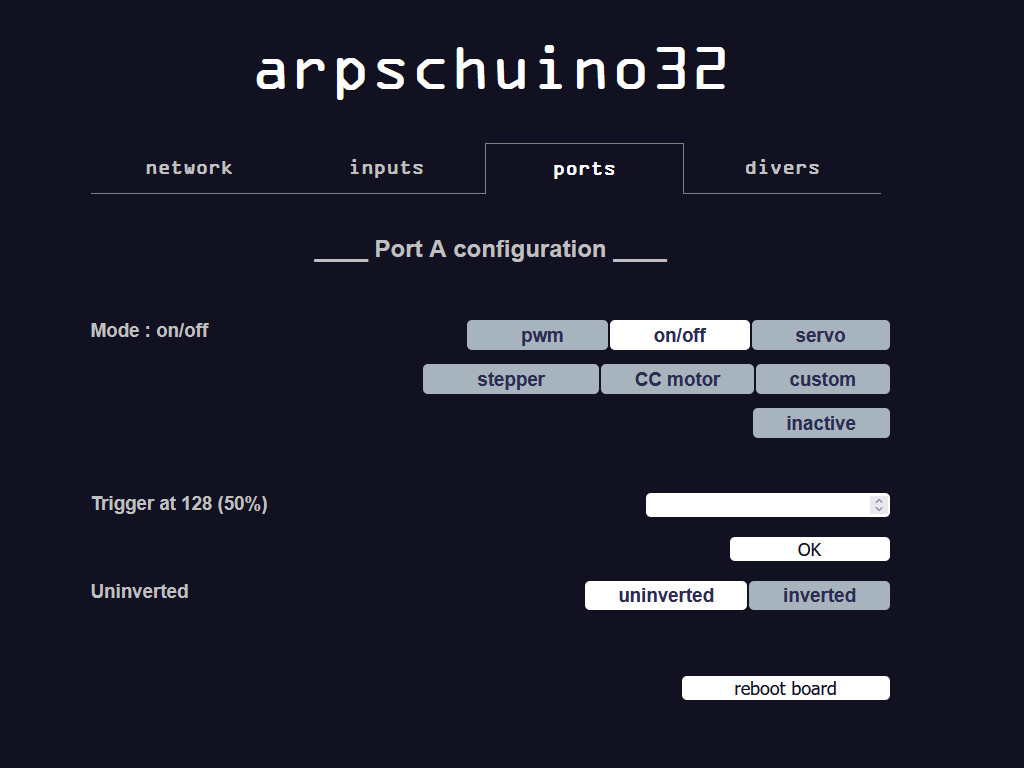
4.On/off configuration:
The on/off mode is used to control relays, electromagnets, solenoids etc...
Trigger :
Here we set the level where the output will go from off to on. It is defined in DMX steps (0/255) but the server will also display the percentage value.
Inverted/uninverted :
You can reverse the behavior: 0 = on, full = off.
5.Servo configuration:
Let's see the servos. These are hobby servomotors, not those used in industry.
This mode can also be used to drive model brushless motors, see our DC motor tutorial for more info.
New in 1.2 Since version 1.2 of the arpschuino firmware, each servo motor can be configured individually.
We choose the motor that we want to configure, or we configure them all at once by choosing "all".
Servo angle :
To be determined, in degrees, depending on your needs, but also on your servos.
If a motor behaves strangely and vibrates at the end of its stroke, it may be because you have set an angle beyond its capabilities.
Inverted/uninverted :
The stroke of the servomotors can be reversed.
No detach/detach :
The detach mode is used to deactivate the motor when it does not receive a new command.
This is useful for saving energy in the case of battery power.
It can also be used with cheap motors which sometimes have the annoying tendency to wobble (Wahlberg shutter users may know what I'm talking about!).
using servo mode to control hobby brushless motors:
Hobby brushless motors are controlled like servo motors (see DC motor tutorial),
in this case the DMX circuit will control the rotation speed. You will need to be in no detach mode.
Attention, for this use, before connecting anything, consult our motor tutorial
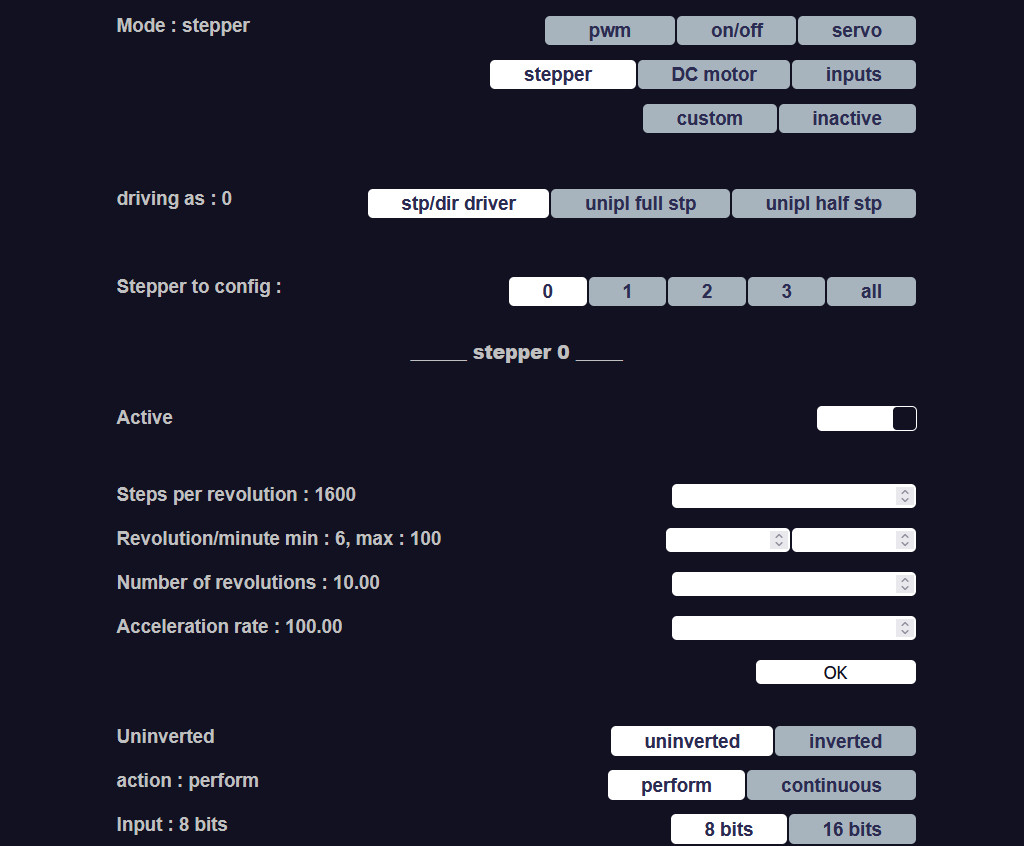
6.Stepper configuration:
You can first take a look at our tuto stepper.
The wiring is identical to that with the arpschuino².
New in 1.2 Driving as:
Let's start by choosing the type of control, depending on the driver/motor pairs that we are going to use.
Here, 3 modes: stp/dir driver (0), this is the mode suitable for motors controlled by standard drivers
Pololu or boxed drivers.
unipl full stp (1), unipolar full pitch, for unipolar motors such as 28BYJ-48 with a direct transistor driver.
unipl half stp (2), unipolar half-step, for the same material but for half-step piloting.
Note that the stp/dir mode allows driving 4 motors per port, the other two modes only allow 2 motors per port.
Stepper to config:
We then choose the motor that we want to configure, we can also configure them all at once by choosing "all".
Active :
A switch to define if the motor will be active or not. If you only use two motors, for example, put the other two in "inactive" mode.
Steps per revolution :
The number of steps per revolution must correspond to that which you have set in your driver.
For a 200-step motor set in quarter-step, we will set at 800 (200x4).
Revolution/minute :
These two parameters relate to speed: minimum speed and maximum speed in revolutions per minute.
So the speed reached by the stepper motor will be between these two values, depending on the level of the DMX channel controlling the speed.
The maximum speed achievable depends on the motor used, if you set too high a speed the motor will block...
Number of revolutions :
In perform mode (see below), this parameter defines the total stroke of the motor in number of revolutions.
You can put a floating point number here.
It is not used in continuous mode.
From firmware version 1.2, this parameter can be set by autocalibration (see below).
Direction (inverted/uninverted):
You can reverse the default direction of rotation of the motor.
New in 1.2 Acceleration:
Since version 1.2 of the arpschuino firmware, you can adjust the acceleration of the motor.
The value to enter is expressed in revolutions/minute per second.
For example, if the acceleration is set to 100, the motor will take one second to go from standstill to 100 rpm.
A value can be entered with two decimals.
action :
In perform mode, the position of the motor is precisely controlled, according to the stroke defined previously.
The first DMX parameter (or the first two, see below), defines the position. The second (or third), speed.
In continuous mode, the motor rotates continuously.
The first DMX parameter controls the direction, the second the speed.
8bits/16bits :
This option is only available for perform mode.
8 bits for position control with one DMX channel, 16 bits for two channel control such as a moving light.
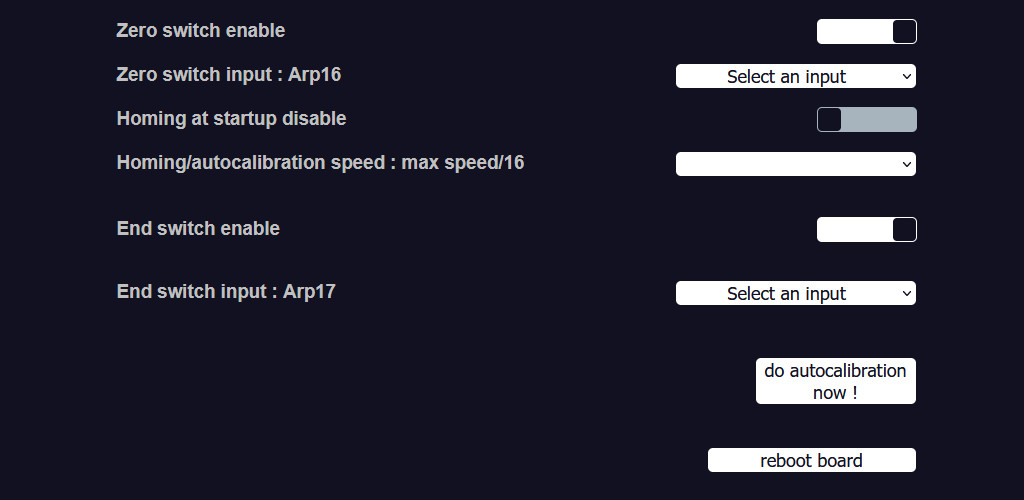
New in 1.2 Switches:
Since version 1.2 of the arpschuino firmware,
each motor can be equipped with a zero switch and an end switch.
Enable:
Each of the switches can be activated or not. You can have only zero switch, only end switch or both.
Switch input:
Here we select the input where to connect the switch. You can use the other port, put in input mode, or the four inputs of the input port.
Remember to check that the output is not already used by another motor.
Homing at startup:
If you activate this option, the motor will automatically reset to its zero point each time the card is started.
Be careful not to activate it if you have not yet set up the switch, otherwise the motor will search forever for its starting position!
Homing/autocalibration speed:
Here we adjust the speed of homing and autocalibration (see below), it is relative to the maximum speed defined above.
It can be between 1/16 times the maximum speed and the maximum speed.
Do autocalibration now! :
This button is available when the zero switch and the end switch are active.
After a press, the motor will go to its final position (end switch) then return to its starting position (zero switch)
counting the steps. The number of revolutions to perform will then be automatically defined in the Number of revolutions field (see above).
The board can then restart taking this new data into account.
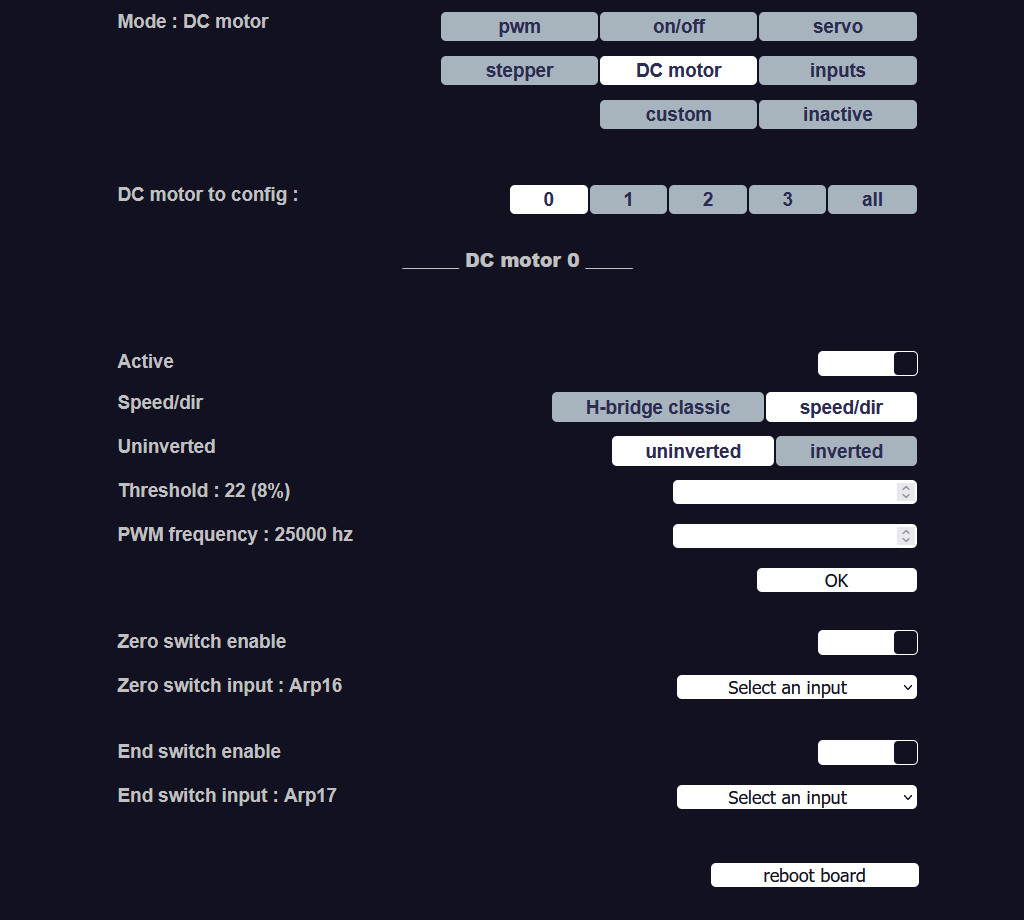
7.DC motor configuration:
This mode is intended for controlling DC motors with classic H-bridge type L298N
or driven in speed/dir mode like the cytron MD30C.
Hobby brushless motors are controlled with the servo mode.
See our DC motor tutorial for more info.
Each motor is driven by two DMX channels.
The first controls the direction, the second the speed.
Again, each motor can be configured individually:
New in 1.2 Driver type:
Choose H-bridge classic or speed/dir depending on the driver used.
Direction :
You can reverse the default direction of rotation of the motor.
Threshold :
Often the motors do not start from the first DMX steps.
A motor will for example start at 9% (25 DMX steps in 0/255).
You can therefore adjust this threshold, so that the motor starts without downtime from the first DMX steps.
This value is defined in DMX steps (0/255) but the server will also display the value in percentage.
New in 1.2 PWM frequency:
This value defines the PWM frequency and must be between 500hz and 312500hz.
In H-bridge classic mode, it is better to choose a frequency beyond the audible frequencies so that the motor does not "whistle".
We will therefore choose a value greater than 20000hz. 25000hz, the default is fine.
For motors in speed/dir mode, refer to your driver's documentation. It is generally a value of the order of 1000 or 2000hz.
New in 1.2 Switches (from version 1.2):
As with stepper motors, zero and end switches can be activated.
Enable:
Activate the switch.
Switch input:
Here we select the input to connect the switch. You can use the other port, put in input mode, or the four inputs of the input port.
Remember to check that the output is not already used by another motor.
8. New in 1.2 Inputs mode:
Select this mode to put the whole port in input mode.
The configuration will be done from the port where these inputs will be used (see stepper and DC motor configuration).
8.Custom and inactive modes:
The custom mode allows you to program yourself the action that the port concerned will perform.
This will be the subject of another tutorial ;)
In inactive mode the port does nothing... To be used when only one port is used.
In case of difficulties, do not hesitate to ask questions on the forum arpschuino.